
The Jamberry new Fall catalog is up and running!! Come and check out our awesome new Fall, Halloween, Christmas and NEW designs!! Something for everyone!!
www.reneer.jamberrynails.net
Tuesday, September 3, 2013
Saturday, July 6, 2013
Jamberry Nails!!
Life is full of surprises!!! Every turn can take you somewhere different!!
I started a journey with Jamberry Nails almost one year ago! Never in my wildest dreams did I ever think I would find a company that I could be so successful in!!
Jamberry is offering an exciting sign up opportunity for the month of July!
Ask me for more info!! Change your life today! I am so happy I took that leap of faith!!
Tuesday, March 12, 2013
Hope everyone has a wonderful day!!
Its going to be a TERRIFIC Tuesday!!!
Here are my TOP TEN reasons to smile today!
Do you have 1 reason to smile you can share with me?
1. Spring is in 8 days!!
2. My crocus are growing like crazy! Can't wait to see that first flower peek out!
3. It's getting warm enough to open a few windows now and then!
4. My wonderful friends
5. My wonderful Family
6.Picking out paint and other things for a few Spring updates on the house!!
7. Daughters and my grandsons! I am so very blessed!
8. My Jamberry Family!
9. The opportunity to work from home
10. The opportunity to help other people just because I can and I want to!!
Monday, March 4, 2013
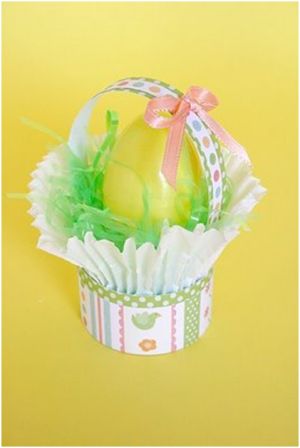
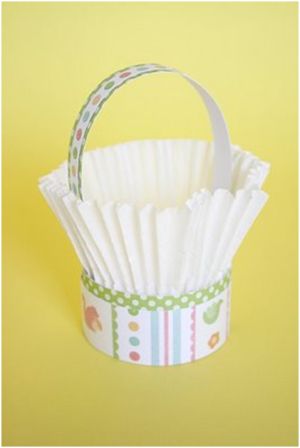
These are so stinkin' CUTE!!!!!
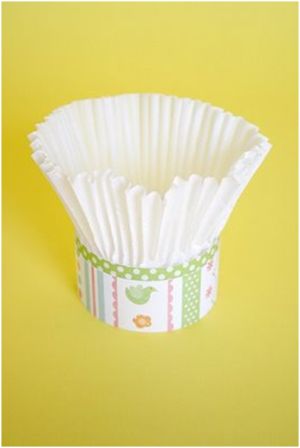
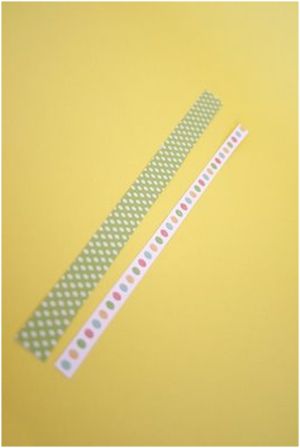
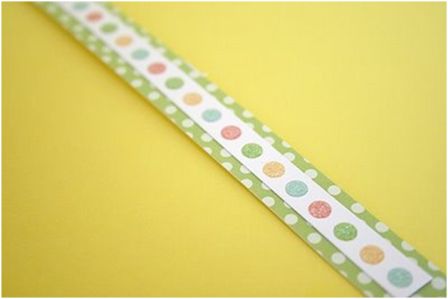
These mini Easter baskets from Anjeanette of Roots and Wings Co. are so clever. They use cupcake liners and are just the perfect size for an individual Easter egg, whether plastic or real! Give as favors or write names on the plastic Easter eggs and use for decorative Easter place-cards.
Materials:
Instructions:
These mini Easter baskets from Anjeanette of Roots and Wings Co. are so clever. They use cupcake liners and are just the perfect size for an individual Easter egg, whether plastic or real! Give as favors or write names on the plastic Easter eggs
and use for decorative Easter place-cards. Materials:
- 1 piece of patterned paper
- 1 piece of contrasting paper
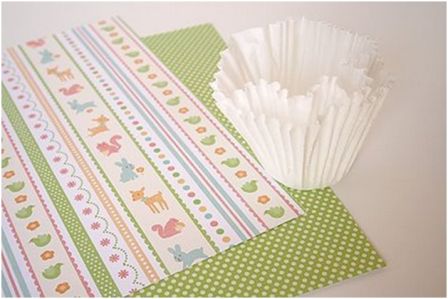
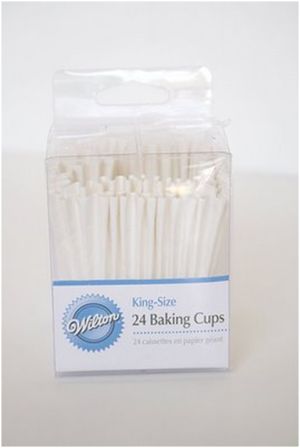
- 1 king-sized cupcake liner
- 1 regular cupcake liner
Instructions:
- Cut a strip of the patterned paper about 1 inch tall. I use the whole width of the paper and cut it to size in a bit.
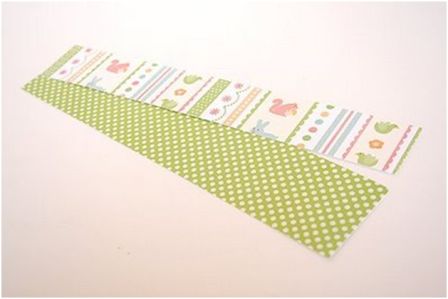
- Cut the contrasting paper about 1/4 inch taller than the
patterned paper. Stack the contrasting paper behind the patterned
paper, and using a good paper glue (non-buckling glue), glue them
together. Glue them into a circle the same diameter as the bottom of
your cupcake liner. Cut it if it is too long.
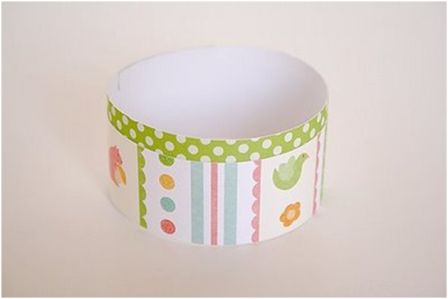
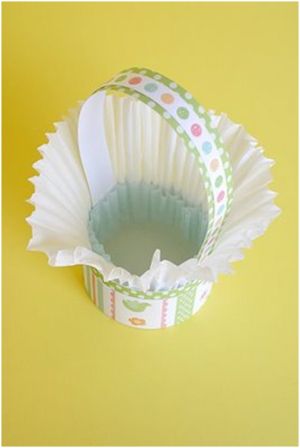
- Slip the cupcake liner into the circle and glue into place.
- To make the handle cut a strip of the patterned paper about 1/4 inch wide. Cut the contrasting paper about 3/4 inch wide.
- Stack the patterned paper on top of the contrasting paper and
using the same good paper glue, glue down the center of the contrasting
paper.
- Glue the bottom of the handle into the bottom of the basket. The glue will be hidden.
- Take your regular cupcake liner and glue to the inside of the
basket. You just want to glue the bottom and let the sides conform to
the inside of the basket.
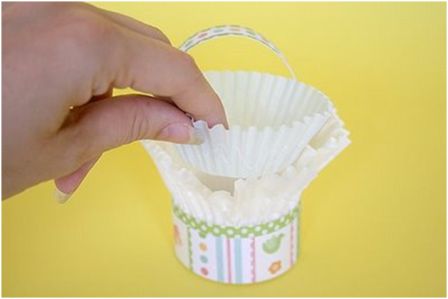
- The inside is nicely lined and you don't see any glue.
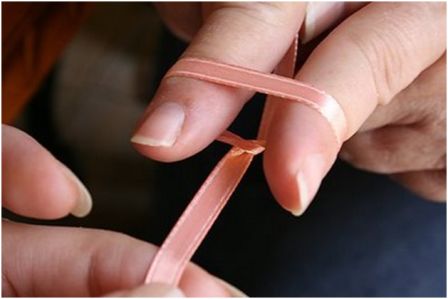
- Now the cute little basket needs a little dressing
up. My Mom showed us how to make these bows when we were little. Since
she was over, I decided to use her hands to demonstrate. Take a length
of ribbon (for this, I used about 8 inches) and wrap the middle around
your assistant's fingers like so:
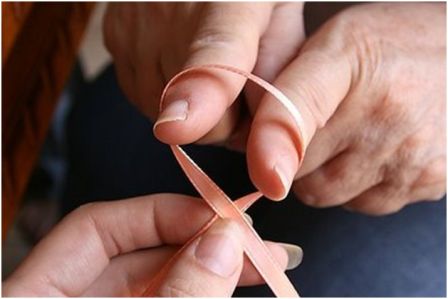
- Cross the ribbon under their fingers. Bring the ribbon up between their fingers above and below the twist
- Tie in a knot. Take the ribbon off your assistant's fingers and you have a nice little bow. Trim the ends if needed.
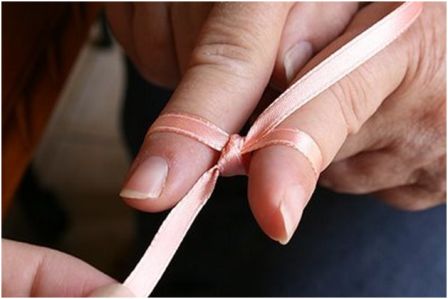
- Attach the bow to your handle, stuff it with some grass and place a filled egg, or a chocolate bunny in it. These would be adorable filled with chocolate bunnies and set at each person's place setting at the Easter table.
Tuesday, February 26, 2013
Just a few more days if you want any of the
retiring designs!! If you go to the website under the shop category, all
retirees are listed under the first category of going going gone! All
are buy 3 get one free, and any orders received by 11:59
pm 2/27 will get entries into our mystery hostess drawing! Will be
drawing the winner on 2/28 at noon!!! Also, our February Sister Style
Exclusive is only available until 2/28! The monochromatic will fit well
with many many clothing choices!!! And will not be available again!
www.reneer.jamberrynails.net

www.reneer.jamberrynails.net

Tuesday, February 5, 2013

Tuesday, January 29, 2013
Guess what???
I have a secret! Jamberry Nails is making changes! And the newest one is HUGE! Our business is going to soar!!! BUT...I can't tell you!!!
UNLESS you join my team! If you are looking for a ground floor opportunity with a company that is going places, please, lets talk!
I have never been more excited about any business opportunity or company as I am now!

Tuesday, January 22, 2013
Retiring Jamberry Nail Designs
Time for a new catalog!!
The following designs will only be available until 2/28/13
See something you like? www.reneer.jamberrynails.net
Get em while you can! Once they are gone thier gone!!


The following designs will only be available until 2/28/13
See something you like? www.reneer.jamberrynails.net
Get em while you can! Once they are gone thier gone!!


Sunday, January 6, 2013
CUTE Idea!!

Materials:
- Plywood rectangle
- Sand paper
-
White spray paint
- Recycled denim
- Patterned fabric
- Scissors
- White craft glue or Elmer's Glue All
- Paintbrush
Instructions:
-
Lightly sand the plywood, removing any rough edges. Spray the plywood
with white spray paint and allow to dry. Add a second coat and let dry.
Light sand if it feel rough to the touch.

-
Cut denim and fabrics into different sized circles.

-
Arrange circles on the plywood, layering different sizes of
contrasting colors and patterns. Use some with three layers, others with
two, and some just with one.

-
Cut a tree trunk from a piece of denim.

-
Cut the trunk into strips.

-
Lay the strips of trunk on the plywood.

-
Once you have everything arranged the way that you want it, use a
paintbrush to lightly apply a coat of glue to the back of the denim. Be
careful not to get glue on the front as it can discolor the denim,
making it darker. Gently press and smooth the pieces in place.

Please take a few minutes and visit my friend Angelin'as websites!!!
Anything you need? She can help you out!
www.Gr8Skin4U.com
www.InMySkinnyJeans.com
Anything you need? She can help you out!
www.Gr8Skin4U.com
www.InMySkinnyJeans.com
Saturday, January 5, 2013


Getting back to the blog!! I have been a way for a while, but looking to share again..life's been a little rough, but it;s a new year and new beginnings!!! Watch for lots of new stuff!!
I made some wire wrapped earring for Christmas presents, had never done it before.....see pictures and my attempts, they were very well received!!


 Pretty good for a beginner?????
Hope you like!
I made some wire wrapped earring for Christmas presents, had never done it before.....see pictures and my attempts, they were very well received!!


Hope you like!
Subscribe to:
Comments (Atom)
